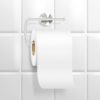
Prolific Plumbing is a Toilet Roll holder installation professional servicing Hurstville and other areas of Sydney. Learning how to install toilet roll holder into your bathroom would come in handy when you move into a new home and want to fix a new toilet roll holder into our new toilet or when we want to renovate our homes or when the toilet roll holder, we use go bad.
In any case, this article will come in handy as it is written to explain the step-by-step process to fix and install your toilet roll holders for your toilets. The whole process is easier than installing a shower screen, but you still need to know what you are doing.
Some of the tools Prolific Plumbing uses to install toilet roll holder include the following:
To start to mount your toilet tissue roll holder, you will need the tools listed below. A stud finder is optional, but it will make the job a lot easier and faster.
- Power drill with drill bits
- Bubble level
- Screwdriver
- Masking tape
- Stud finder (optional)
- Hammer (when using drywall anchors)
Step by step process to install toilet roll holder
Step 1: Choosing the location for the installation
There is no rule as to where to and where to not fix your toilet roll holder, but the generally accepted standard is to mount the toilet roll holder on the wall 26 inches above the floor, and 8 to 12 inches in front of the toilet. The idea is the that toilet paper holder needs to placed within easy arm’s reach from your toilet and should be high enough to prevent the toilet paper from dragging on the floor
With that said there is a lot of possible position to pick from, but when there isn’t a suitable location to the left or right of the toilet you can consider a couple of other options.
Other options you can consider include:
- Freestanding holder– If you can’t decide on a mounting location, you could purchase a non-mounting holder instead. Freestanding holders can be easily moved to another location, this way you won’t have to drill holes. But people go for these options and would prefer the mount option but either way they both work fine.
- Install toilet roll holder in front of the toilet – Another option is to mount the holder on a wall in front of the toilet, and you can also measure the position 26 inches high from the ground. This option is only feasible if the holder would still be within reaching distance from the user in the toilet.
If you install toilet roll holder on drywall you should try to centre the holder over a stud, if you can’t find the stud you need, then you will need to insert some wall anchors in the drywall before screwing your toilet paper in place.
Step 2: Check if all the parts you need are available
Now you need to select and buy the actual part. Temple and Webster got some great toilet roll holders or check out your local Harvey Norman. The next step is to make sure you check if all the tools and parts you need are available. Before you start any project, you should make sure you have all of the parts you need to complete it. Open up the box for the holder you’ll be installing and make sure you have everything you need.
You can also dry-fit the pieces to see how they will go together before you start to drill. Most kits include a paper mounting template to assist with drilling the holes. Locate the template
Step 3: Measure the holder’s location using the template
Every toilet paper holder has a template that will help you decide where to attach the two brackets on the wall. One way you do this is to place the template against the wall and use the carpenter level to confirm if the template is leveled. You should use a pencil to mark the places where the brackets will be attached to the wall.
This process will allow you to easily know the precise place to drill holes in your wall so you can attach the holder to the wall. Sometimes the template will not be a separate piece of paper, it would be printed to the back of the box instead.
Step 4: Make Sure the Template Is Level
Place your carpenter level along the top edge of the template and make sure it is completely level. If the template isn’t level, then the holder will not be level once it’s mounted. If you need to make any adjustments loosen the tape and re-level the template. This step is very important so you might want to double-check your work.
Step 5: Locate Any Studs in the Wall
Next, use a stud finder to determine if you will be drilling into any studs. Slowly move the stud finder along the wall and mark any studs you encounter.
If you discover that any of the holes will be drilled into a stud, it’s not necessarily a problem, but you will not need drywall anchors for those holes. Some people prefer to have at least one set of mounting holes go into a stud for added stability.
If you don’t have a stud finder, you can gently tap on the wall to look for the studs
Step 6: Mark the screw location on the wall with a marker or pencil, place your template and drill your holes
This will help make your work neater and better when you gradually drill the holes, as you have already marked the right spots to drill. Make sure the template is level before you start to drill.
After making sure the template is located in the proper location you can begin drilling the pilot holes.
- Use the drill bit size listed in the instructions.
- Making sure the drill is level carefully drill holes in the locations marked on the template
- Remove the template after all holes have been drilled, most mounting systems require four holes.
Note: Try to make the holes smaller than the screws especially when you are not using wall anchors. Make sure the hole is slightly smaller and not as deep as the length of the screw. Try to drill precisely and neatly.
If you have wall anchors you should drill the holes a bit bigger and slow deeper at least as deep as the wall anchor, then use the hammer to put the wall anchor in place. It is ideal to add a wall anchor if you don’t have studs on the wall this will prevent the toilet paper wall screw from ripping out of the drywall.
If there is an instruction on the bit size in your toiler toll holder manual then you should drill the holes using the bit size specified in the instructions.
Step 7: Install the Mounting Brackets
- Using a hammer, tap the drywall anchors into the screw holes. If the holes go into a stud, you will not need the anchors.
- Secure the mounting brackets to the wall using the screws in the kit.
- Place the holder on the mounting brackets
- Secure the holder to the brackets by tightening the lock screws using a screwdriver. The lock screws should be on the bottom so they cannot be seen. These lock screws should firmly hold the bracket against the wall. Before screwing the brackets in you should inspect if the screws are regular or Phillip heads so you know the kind of screwdriver you need.
- Hang the roller holders on the attached brackets. On the base of the roller holder there is a mark showing which side goes up and which stays down. Press the roller holder into place, one on each bracket you should not do that if your toilet holder did not come with two set screws you can skip the next step.
- Make sure the holder sits flush against the wall. Then screw 1 set screw in the bottom of each roller holder. The set screw will clamp the roller holder against the bottom of the bracket and keep the roller holder from popping off the bracket
- Add toilet paper and the spring loader paper holder. To do this take a roll of toilet paper and slide the central cardboard tube over the paper holder. You should squeeze both sides of the paper holder inward into the paper handler between the two roller holders. Release the spring-loaded sides and make sure the toilet paper rolls easily.
This is the leas step; you should know that this paper holder instalment can be done as quick as 20 minutes.
Extra tips you should know:
Drilling holes in drywall would create a lot of dust, so I recommend cleaning it up with a vacuum as soon as possible.
Gently pull on the holder to make sure that it is attached securely to the wall. If the holder moves when you touch it go back and make sure all of the screws are fully tightened.
You should know that to install toilet roll holder you can call Prolific Plumbing (we are a Sydney plumber that does not consider such jobs too small to attend) to help you in case you don’t have the time to learn the DIY method and want to install toilet roll holder faster and proper.
You should also be very careful when trying to screw the bracket into place.
If you are in Australia and you need a fix on your blocked drain. You should call prolific plumbing services to help you fix them. They are one of the most reliable and efficient plumbing repair service company in Australia today.